AppStream Image Builder Automation Part 2 – We’re chocolate[y]-greedy

In part 1, we have seen how to instantiate an image builder and how to be able to login remotely to this instance without going through the user interface.
In this second blog post, we’ll see how we (Laurent Mas and I) automated applications installation.
At Devoteam Revolve, we’ve been automating Windows on AWS for several years now and if you’ve followed our webinars about Windows Automation [links], you should have heard about chocolatey.
Chocolatey is a package manager for Windows, pretty much like yum or apt for Linux OS. It bundles installation scripts in a .nupkg file and handles versioning.
Our usual implementation relies on a NuGet server (it can be a simple Windows EC2 running an IIS server) to store our .nupkg files, and an Amazon s3 bucket where we store our application sources.
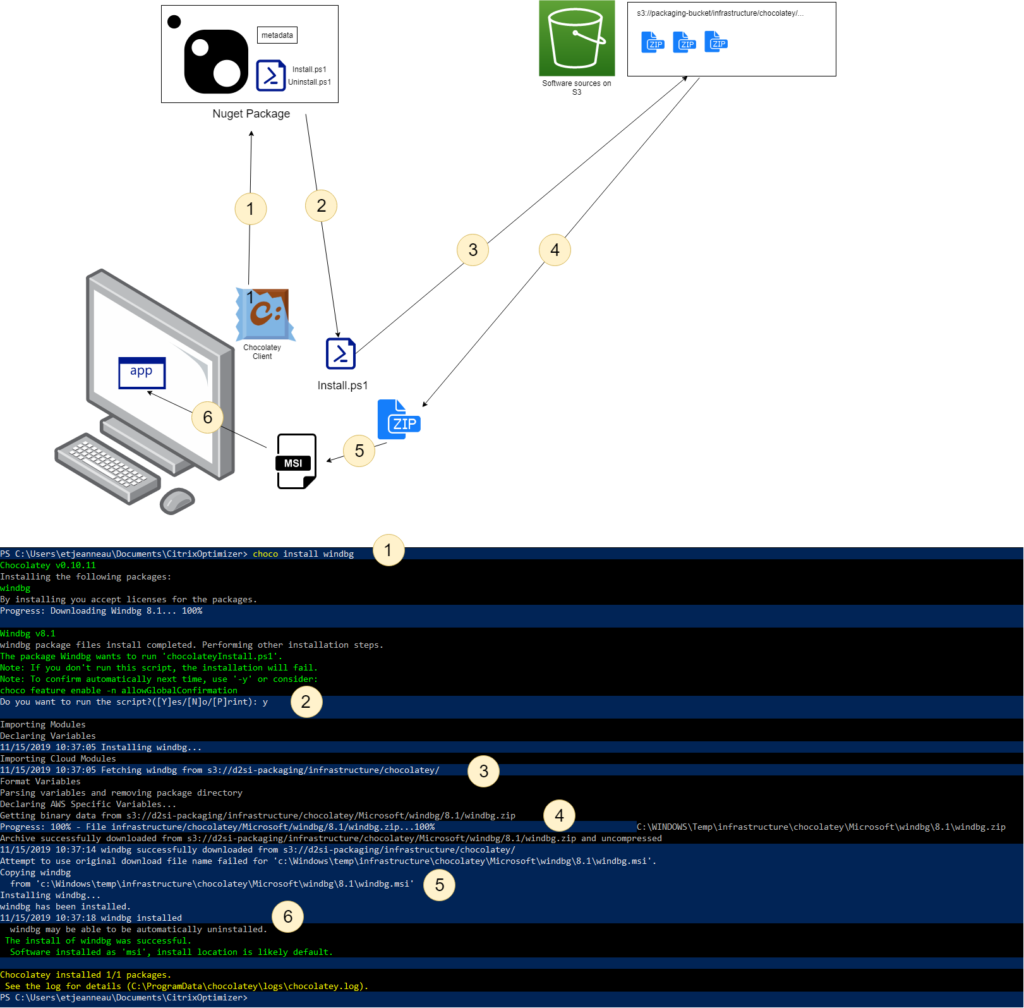
The way we implement our standard installation script for an application in a chocolatey package is as follows:
- There’s a file named ChocolateyInstall.ps1 inside the .nupkg file that chocolatey knows about when you run “choco install my_app”
- The script ChocolateyInstall.ps1 has logic to download our software sources from s3 and we’re using the IAM instance profile to get the proper permissions.
- Once downloaded, the script unzips the content and launches the installation tasks silently.
Back to our image builder, we wrote a bunch of functions and scripts to handle our basic needs:
- Configure the Windows Firewall for WinRM + basic WinRM configuration
- Connect through a WinRM session and run a powershell script
- Reboot the image builder and reconnect after reboot
- Install an application using chocolatey and publish it using the AppStream image assistant.
Here is our main loop to install app the applications from a given list:
WriteLog "Installing chocolatey client software and configuring it to point to $nugetRepo" $LoggingFile 3 "full" "ChocolateyAutomation"
    $install_choco=execute_remote_script -ip_address $ip_address -creds $winrm_credz -scriptName chocolatey_install.ps1
    write-output $install_choco

    WriteLog "Rebooting instance...Please wait" $LoggingFile 6 "verbose" "ChocolateyAutomation"
    reboot_and_wait_for_winrm -ip_address $ip_address -creds $winrm_credz -retry_time $retry_time -max_retry $max_retry -reboot_wait $reboot_wait

    $all_app_install=""

    #install all packages
    Foreach($app in $apps)
    {
        $app_id=$stack.stack_definition.$app
        WriteLog "Installing packages: $app_id ..." $LoggingFile 3 "full" "ChocolateyAutomation"
        $app_args = "-bucket", "$app_bucket_name", "-key", "$all_app_info_key", "-application_id", "$app_id"
        $install_app=execute_remote_script -ip_address $ip_address -creds $winrm_credz -scriptName add_application.ps1 -argument $app_args
        write-output $install_app
        $all_app_install+=$install_app
    }
Our add_application.ps1 script is not very complicated however it handles some edge cases that makes it a bit too long for a blog post. Basically, what it does is:
- Read application characteristics (chocolatey package, application name, icon…) from a CSV file located on an Amazon s3 bucket
- Launch the installation of the chocolatey package
- Publish the application with the AppStream image assistant (see AWS blog post)
For the chocolatey package installation, we kept an option to choose the version of the package we want to install, otherwise it’ll always use the latest version:
Try {
            if($package_version){
                $installResult=cinst -y $package_name --version $package_version | out-string
            }else{
                $installResult=cinst -y $package_name | out-string
            }

            Write-output "$installResult`n"
        }
        Catch {
            Write-Output "ERROR Failed to install $package_name`n"
            Write-Output $_ | format-list * -force
        }
With all this chained together we are now able to automatically:
- Create a new AppStream image builder instance
- Connect to the instance
- Install our applications
- Publish our applications with AppStream image assistant
- Seal our image and publish it in the registry
Credits: Thanks to Mathieu Dalbes for the long hours spent testing and debugging with us!
Reference:
Commentaires :
A lire également sur le sujet :