Vault: Reducing code dependency with Vault Agent – part 2: application integration

We saw in the previous article what Vault Agent is and how it can help us to reduce code dependency. In this second article we will see how to integrate Vault Agent with the application, how to authenticate and retrieve secrets, before testing it with an example.
In order to make the integration as transparent as possible for our application, our integration of the Vault Agent must be done in 2 parts:
- Set up the authentication method and validate the Vault token retrieval. If necessary, renew the token.
- Retrieve the secrets as well as the templating of our file containing our secrets. If necessary, verify that our secrets are renewed.
In our example, we will rely on:
- Vault in version 1.6.2
- Terraform in version 0.14.6
- A database which will be here MySQL in version 5.7
- A PHP 7.2 and Apache web application
- With static (secret engine K/V) and dynamic (secret engine Database) secrets
- An Approle authentication method will be used to authenticate the application to the Vault.
You will find the sources to reproduce this environment here.
The environment is based on docker containers so that you can reproduce the example on your side.
Concerning the stack docker (docker-compose.yml, app.yml, etc), you can find details in the previous articles or in the readme of the project.
Integrate the Vault Agent with the authentication method
Let’s start by installing Vault Agent.
To do this, simply download the Vault binary or packager with the application. All installation instructions can be found in the official HashiCorp documentation.
In our case, we add it in our dockerfile to download the Vault Agent to build our image.
Once the installation is done, we can focus on the authentication which is Approle type with the Vault Agent.
In our case, for demonstration purpose, we will directly inject the role_id and secret_id in our container via the environment variables. In the case of a pipeline or a CI/CD, the implementation of the Approle method in a secure way is more technical and would deserve a whole article on the subject. You can find a HashiCorp Learn on the subject AppRole With Terraform & Chef
For our Vault Agent, to be able to authenticate in Auto-Auth, we need to provide a configuration file including: the authentication method and the Sinks (where should it write the Vault token?), currently having only a file as a possibility.
In our case, we will have the following configuration:

On the Approle methode side, we have to :
- Specify where the role_id and secret_id are located. In our case, these values are passed as environment variables, but the Vault Agent is only able to read these values via a file. So we will have to create these files at the entrypoint level with the expected values.
- The remove_secret_id_file_after_reading option removes the secret_id after the Vault Agent reads the file. A secure method to ensure that no one except the Vault Agent is able to authenticate again.
On the sink side, the configuration is rather simple:
- The path on which the Vault Agent will write the Vault token.
- The mode on which the Vault Agent will write the file rights. Here we put 644 so that the apache server is able to read the token. We can also set 600 to ensure that only the Vault Agent is able to read and modify the token.
Finally, the last elements of our configuration:
- Vault address: we pass the environment variable VAULT_ADDR containing the address of our Vault. The Vault Agent is able to refer to this address. In the opposite case, the Vault address must be entered directly in the configuration file.
- pid_file: is the path on which the Vault Agent process ID is written. Knowing that the Vault Agent will run in background, it may be relevant to refer to this file in order to kill the process if necessary.
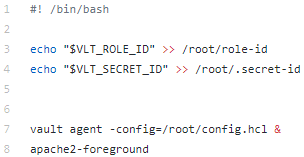
In order to complete our integration, we need to add an entrypoint to our container in order to:
- Provision the role_id and secret_id files through our environment variables
- Start the Vault Agent process in the background
- And finally launch our apache server
Our entrypoint:
At this point, the Vault Agent is able to authenticate to the Vault and renew the Vault token.
Integrate the Vault Agent to retrieve secret
As we have seen previously, the Vault Agent is based on a template file in order to transform it into a file containing our secrets.
For our template, we will retrieve our dynamic database secret. We can do the same thing for other dynamic or static secrets.
We want the secrets to be stored in a JSON format, so we have the following template:
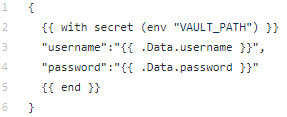
We use VAULT_PATH, an environment variable that contains as value database/creds/web, which is our path in order to retrieve our secret.
Vault Agent should, based on our template, create our secret file that should look like this:

If you would like to learn more about the templating language used by the Vault Agent, you can refer to Consul Template’s documentation.
All we have to do is to indicate to our Vault Agent, in its configuration file, the template source file and the secrets destination file:
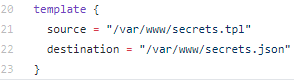
The secrets template file as well as the Vault Agent configuration file must be copied into the dockerfile.
Finally, we just have to tell our application to read the secret file and store the secrets in variables if it is not already the case:

Testing our example
Once the Vault Agent is able to authenticate itself and recover its secrets, all we have to do is test our application. The project README explains in detail each step of the test and a Makefile is at your disposal.
Let’s start with our infrastructure :
$ docker run --rm -v $(pwd)/terraform:/app/ -w /app/ hashicorp/terraform:light init
$ docker-compose up
The infrastructure is operational, we can access our Vault with this address: http://127.0.0.1:8200
On the application side :
$ docker-compose -f app.yml build
$ role_id=$(docker run --rm -v $(pwd)/terraform:/app/ -w /app/ hashicorp/terraform:light output -raw approle_role_id)
$ secret_id=$(docker run --rm -v $(pwd)/terraform:/app/ -w /app/ hashicorp/terraform:light output -raw approle_secret_id)
$ docker-compose -f app.yml run -e VLT_ROLE_ID=$role_id -e VLT_SECRET_ID=$secret_id --service-ports web
The application is now available at the following address: http://127.0.0.1:8080
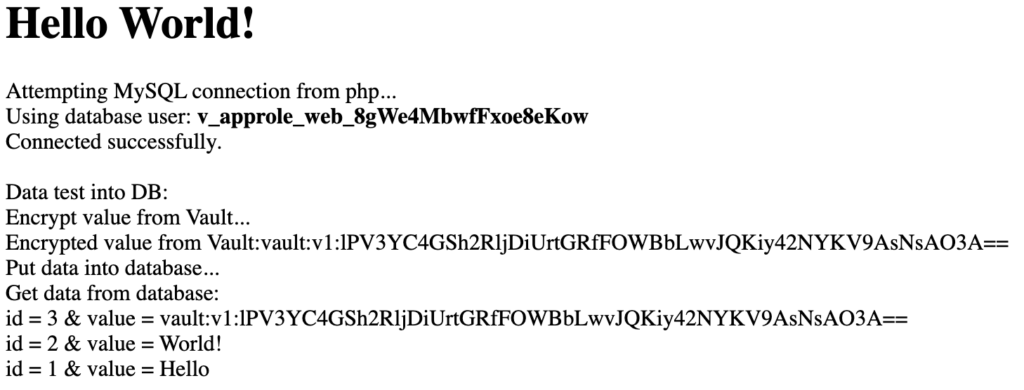
The following page should appear:
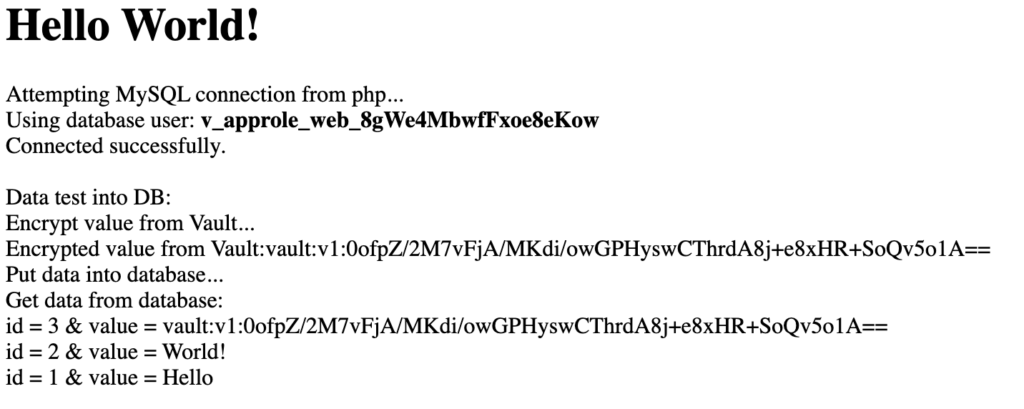
If we refresh the page, only the value encrypted via the Vault’s EaaS (Encryption as a Service) changes and our application re-uses our database secret:
To test the proper functioning of the secret rotation and the Vault token, we can revoke the leases:


Logs on the Vault Agent side:
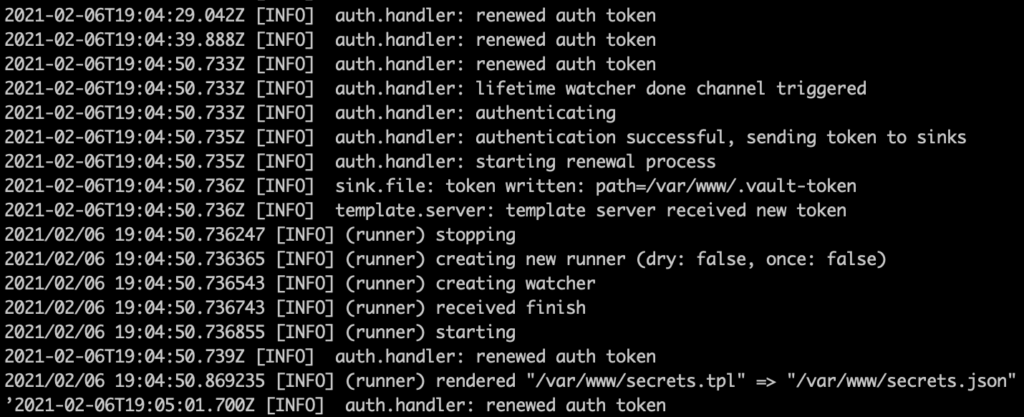
As we an see:
- If the Vault token expires: the Vault Agent re-authenticates
- If the secrets expire: the Vault Agent retrieves new secrets and updates our secret file.
Finally, for cleaning purposes, don’t forget to execute the following commands:
$ docker-compose down
$ docker-compose -f app.yml down
$ rm terraform/terraform.tfstate
What you need to remember
- If your application consumes its secrets through a file, then using the Vault Agent allows you to integrate the Vault seamlessly. Otherwise, if it uses environment variables, there is a possibility of integration with envconsul. For those who wish to test this method, you can consult the GitHub repository which is based on our example.
- Vault Agent takes care of the rotation of your secrets (if they are dynamic) and the Vault token.
- Vault Agent uses a template file to create the file containing our secrets. You can learn more about the Consul Template documentation.
- We no longer modify our application code to integrate the Vault, with the exception of EaaS (Encryption as a Service). The application is able to retrieve a Vault token that is renewed by the Vault Agent for EaaS.
- In our example, we use a dynamic role for the secret engine Database. It is also possible to use static roles if you want to avoid generating a large number of database users on the fly.
- We have modified the entrypoint of our application to launch the Vault Agent but it is possible to launch it at the startup of our container via systemd or other system/service manager in order to avoid altering the entrypoint.
As we have seen in this article, we have removed the dependencies between our application code and HashiCorp Vault with Vault Agent. This also brings an automatic rotation of the Vault token and secrets made by the Vault Agent.
The integration of the Vault within our application becomes transparent and the same goes for the management of secrets by the different teams (dev, ops, etc).
However, in order to make the integration of the Vault transparent from end to end, there remains one question that we have not addressed in this article: How to make the integration of the Vault transparent for the deployment of an application via a pipeline?
This will certainly be the subject of another article!
Commentaires :
A lire également sur le sujet :