Securing Your Terraform Deployment On AWS Via Gitlab-Ci And Vault – Part 2

As we saw in the previous article, it is difficult to authenticate a pipeline or even a Gitlab-CI job to allow secure access to our secrets in least privilege mode. HashiCorp Vault allows us to address this need in a uniform and cloud agnostic way.
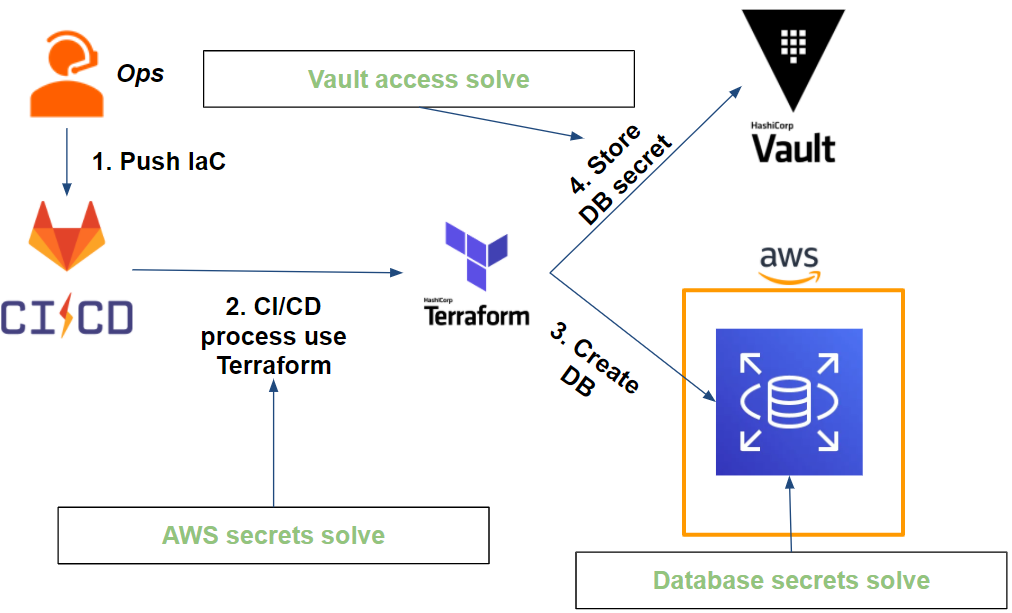
Let’s look at our workflow again, this time adding Vault :
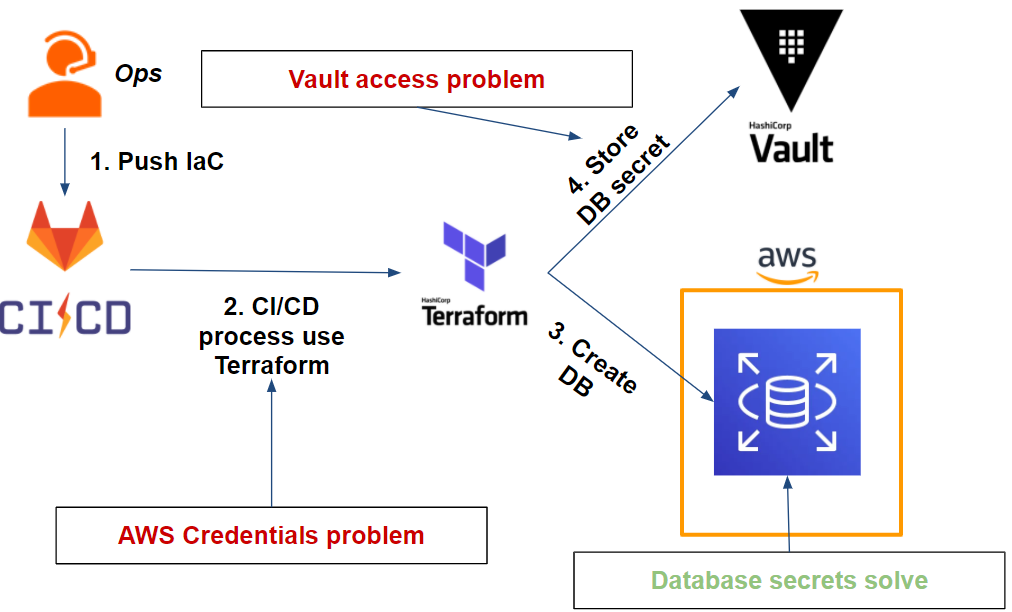
Initially, Vault allows us to store our database secrets and handle rotation. We will discuss this in more detail later in this article.
Second, it is possible for Vault to dynamically generate AWS credentials. However, it raises a new issue that is common to our previous question: how can we allow a Gitlab-CI job to use and store secrets in Vault?
To address this issue with Vault, we’ll address three points step by step:
- Vault must dynamically generate AWS secrets: through the AWS secret engine, we will see how Vault can generate “least privilege credentials” on several different AWS target accounts.
- Our pipeline (Gitlab-CI) must authenticate to Vault on a specific branch: through the JWT authentication method, it is possible to authenticate our pipeline on a specific branch with Vault.
- Our pipeline must be able to use and store secrets in Vault: our pipeline must, once authenticated to Vault, retrieve its AWS secrets and store the database secrets.
To do this, we will use Terraform to configure our Vault via the Vault provider.
All of the code that this article is based on can be found on this GitHub repository.
Generating dynamic secrets with Vault
Our first goal is to ensure that our Vault is able to generate dynamic AWS secrets with least privilege.
Vault uses the AWS secret engine which is able to generate 3 types of AWS credentials:
- IAM user: Vault creates an IAM user and generates and returns its programmatic access (access key and secret key)..
- Assumed role: Vault will assume an IAM role and return session credentials (access key, secret key, and session token).
- Federation token: the returned credentials are the same as the assumed IAM role but this time for a federated user.
Among these 3 methods, we’ll look at the IAM assume role method which will be particularly useful in our multi-account AWS framework.
Let’s take the following example: we have multiple target AWS accounts on which Vault must be able to generate AWS credentials via an IAM assume role.
This will result in the following scenario:

In our example, we need to generate credentials on the target AWS “A account”. Vault will assume an IAM role on the target “A account” to generate dynamic AWS credentials.
Preparation of IAM roles on the AWS side
To do this, Vault must have AWS credentials and permissions to be able to perform its actions on AWS.
Concerning credentials, we have two cases:
- If Vault is in an AWS environment and on an EC2/ECS instance: we can use the profile instances to use temporary AWS credentials.
- If Vault is outside of an AWS environment: we’ll need to generate Access Key and Secret Key via an IAM user and regularly rotate credentials .
Concerning the permissions, HashiCorp uses the following policy as an example:
{
  "Version": "2012-10-17",
  "Statement": [
    {
      "Effect": "Allow",
      "Action": [
        "iam:AttachUserPolicy",
        "iam:CreateAccessKey",
        "iam:CreateUser",
        "iam:DeleteAccessKey",
        "iam:DeleteUser",
        "iam:DeleteUserPolicy",
        "iam:DetachUserPolicy",
        "iam:ListAccessKeys",
        "iam:ListAttachedUserPolicies",
        "iam:ListGroupsForUser",
        "iam:ListUserPolicies",
        "iam:PutUserPolicy",
        "iam:AddUserToGroup",
        "iam:RemoveUserFromGroup"
      ],
      "Resource": ["arn:aws:iam::ACCOUNT-ID-WITHOUT-HYPHENS:user/vault-*"]
    }
  ]
}
This example is useful if we want Vault to generate IAM users. However, this type of policy gives far too many rights for our need to assume a role.
The following policy is required to meet our need:
{
"Version": "2012-10-17",
"Statement": {
"Effect": "Allow",
"Action": "sts:AssumeRole",
"Resource": "*"
}
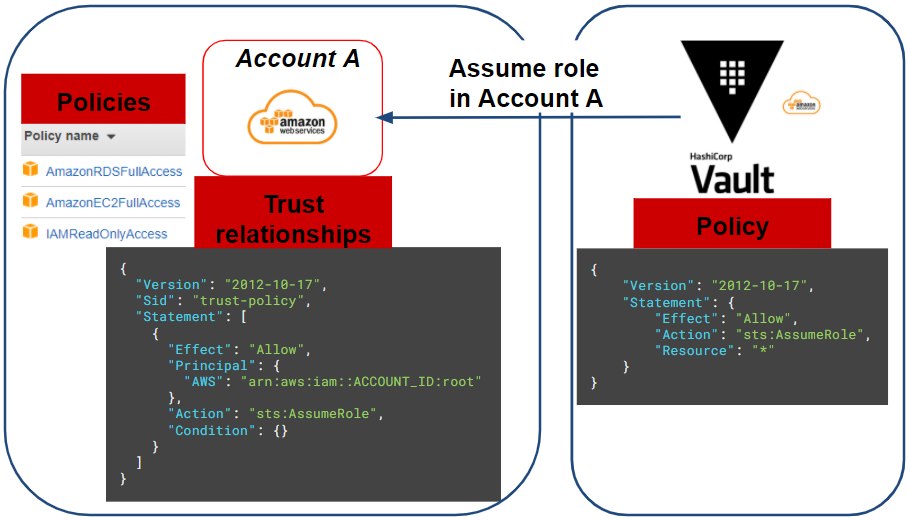
}Once Vault has its programmatic access to the AWS source account and the necessary permissions, all we need to do is create the IAM role (or IAM roles if we have multiple target AWS accounts) for Vault to assume.
For our scenario we will need to deploy an EC2 instance and an RDS database. We will use the following policies (AWS managed) on the IAM role on our target AWS account (A account):
- AmazonRDSFullAccess
- AmazonEC2FullAccess
- IAMReadOnlyAccess
This policy will be restricted later through our Vault for our application.
Finally, the target account’s IAM role must have a trust relationship to allow Vault to assume it:
{
  "Version": "2012-10-17",
  "Statement": [
    {
      "Effect": "Allow",
      "Principal": {
        "AWS": "arn:aws:iam::ACCOUNT_ID:root"
      },
      "Action": "sts:AssumeRole",
      "Condition": {}
    }
  ]
}
To summarise all our actions, the following diagram represents our current situation:
Vault role Configuration
Now that we have configured the AWS part, all that remains is to configure our Vault via Terraform:
resource "vault_aws_secret_backend" "aws" {
  description = "AWS secret engine for Gitlab-CI pipeline"
  path        = "${var.project_name}-aws"
  region      = var.region
}

resource "vault_aws_secret_backend_role" "pipeline" {
  backend         = vault_aws_secret_backend.aws.path
  name            = "${var.project_name}-pipeline"
  credential_type = "assumed_role"

  role_arns = [var.application_aws_assume_role]

  policy_document = <<EOF
{
  "Version": "2012-10-17",
  "Statement": [
    {
      "Effect": "Allow",
      "Action": [
        "ec2:*",
        "rds:*"
      ],
      "Resource": "*"
    },
    {
      "Effect": "Allow",
      "Action": [
        "iam:GetUser"
      ],
      "Resource": "arn:aws:iam::*:user/$${aws:username}"
    }
  ]
}
EOF
}
Here we create our AWS secret engine and a Vault role that will assume the IAM role previously created on the target AWS account.
Note that in the Vault role’s policy document we can restrict our AWS session credentials through the Vault. Here we give administrator rights to EC2 and RDS which can be reduced as required.
Finally, to test our credentials we need to run the following Vault command, which should return our AWS session credentials:
# Vault admin privilege (only for test)
$ vault write aws/sts/web-aws ttl=1m
Setting Up Authentication for our Gitlab-CI Pipeline with Vault
How to authenticate a Gitlab-CI job?
Each JOB in Gitlab-ci has a JSON Web Token (JWT) accessible through the CI_JOB_JWT environment variable.
This JWT token contains information (bound claims) related to our Gitlab-CI project JOB (project ID, issuer, branch, etc) that Vault can use to identify our pipeline. This is encoded in RS256 and signed by a private key managed by the issuer: Gitlab-CI.
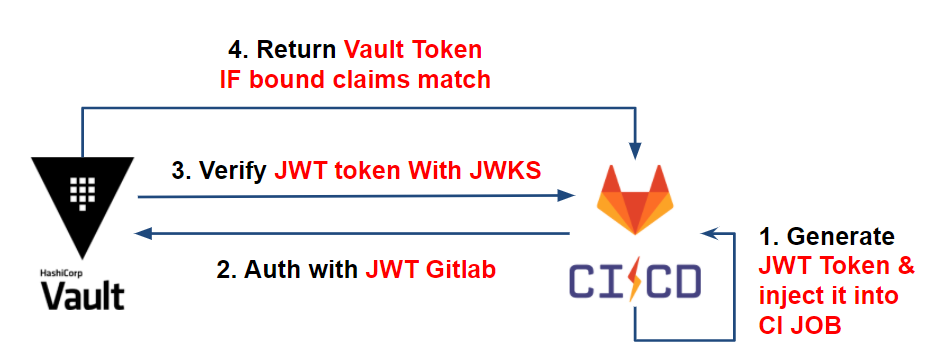
How does it work with Vault?
To verify the authenticity of the JWT token information, Vault will rely on the issuer’s JSON Web Key Sets (JWKS) containing the set of public keys used to sign the JWT.
Once the token has been proven authentic, Vault will check the JWT’s information (bound claims) and compare it with the expected information (which we configure below), such as: project ID, issuer, target branch, etc.
Once the token information matches the Vault’s expectations, Vault delivers its token with the appropriate policy to the CI, allowing the recovery of its secrets.
This gives us the following workflow:
For more information, please see the following articles:
- External CI Secret Management
- Authenticating your CI and reading your secrets with HashiCorp Vault via Gitlab-CI
Putting Vault into practice
We’ve seen JWT authentication between Vault and Gitlab-CI. Now let’s look at the configuration on the Vault side.
For our use case, we have the following scheme:
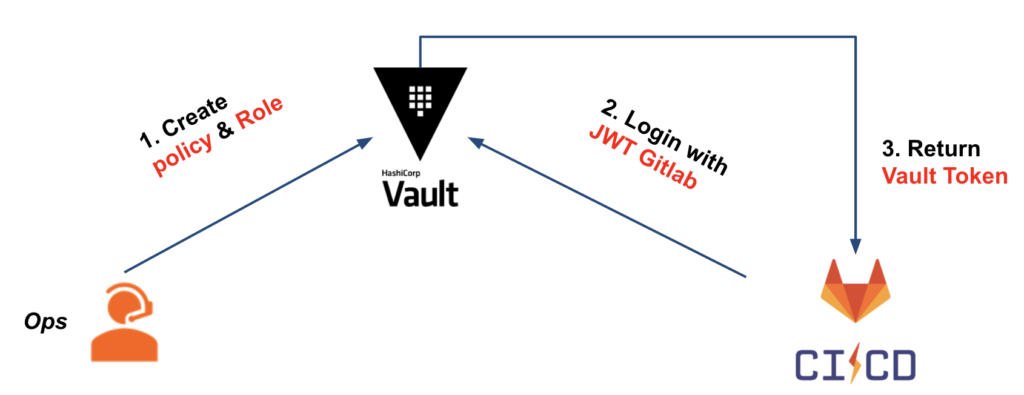
In order to configure our Vault, we will create :
- JWT authentication
- The Vault role based on JWT authentication, which we will use to verify that bound claims meet our criteria
- The Vault policy attached to the Vault token, which will be issued to our CI and will give them the necessary rights to retrieve secrets (AWS type here)
Concerning our first two points, we have the following Terraform configuration:
resource "vault_jwt_auth_backend" "gitlab" {
  description  = "JWT auth backend for Gitlab-CI pipeline"
  path         = "jwt"
  jwks_url     = "https://${var.gitlab_domain}/-/jwks"
  bound_issuer = var.gitlab_domain
  default_role = "default"
}

resource "vault_jwt_auth_backend_role" "pipeline" {
  backend   = vault_jwt_auth_backend.gitlab.path
  role_type = "jwt"

  role_name      = "${var.project_name}-pipeline"
  token_policies = ["default", vault_policy.pipeline.name]

  bound_claims = {
    project_id = var.gitlab_project_id
    ref        = var.gitlab_project_branch
    ref_type   = "branch"
  }
  user_claim             = "user_email"
  token_explicit_max_ttl = var.jwt_token_max_ttl
}
On the side of the configuration of our JWT auth backend, this one remains quite standard and asks to know the domain name of our Gitlab (ex: gitlab.com).
On the side of the JWT auth backend role, we have the bound_claims which are the criteria to respect to authorise the authentication of our CI, such as:
- project_id: the Gitlab project number. Probably the most important element to allow only our project to authenticate.
- ref: in our case, the branch on which the CI is running. Here, we will take “master”.
- ref_type: the type of the reference. In our case, our references will be the GIT branches.
Finally, regarding the policy assigned to our Vault role, we have 4 paths allowing our pipeline to :
- aws/sts/pipeline: retrieve its AWS type secrets.
- db/*: store the database secrets for our project.
- auth/aws/*: to allow the project to authenticate to Vault via an AWS authentication method. We’ll see this part at the application level.
- auth/token/create: to create child Vault tokens. Terraform, through the Vault provider, generates a child token with a short TTL. To do this, we need to assign this path with the « Update » capability to allow Terraform to perform this action. This subtlety is unique to Terraform and you can find more information on this in the documentation.
At this point we are able to authenticate and provide access to our CI with Vault.
Using our secrets in our CI
Now that it is possible for our CI to interact with Vault, let’s look at the execution of our CI.
Here is the workflow we will have when we run our CI:
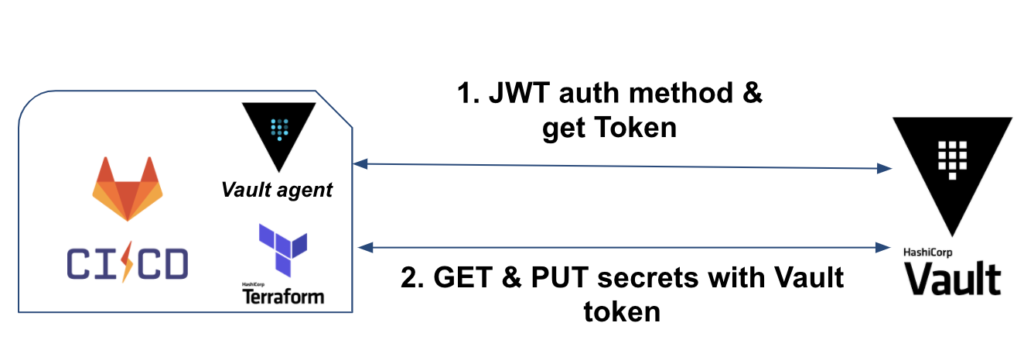
Initially, we will have Vault binary (or Vault in agent mode) which will handle authentication and Vault token retrieval.
In the second stage, Terraform will be used to retrieve the AWS credentials, deploy the IaC and store the database secrets.
Authentication of a CI job with Vault
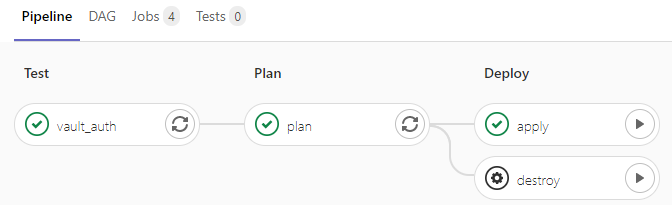
For our CI jobs, we’ll configure our gitlab-this.yml, so that :
- Install Vault and Terraform in a before_script so that the tools are available on all our jobs. To save time, you can build your own CI image to avoid installing them at each job start.
- Have a first test job for JWT authentication via Vault
- Once authentication is tested and working, have 2 sequential jobs: terraform plan & terraform apply/destroy
For our test job, we have the following extract:
image: bash

variables:
  TF_VAR_vault_role: web-pipeline
  TF_VAR_vault_backend: web-aws

vault_auth:
  stage: test
  script:
    - export VAULT_TOKEN="$(vault write -field=token auth/jwt/login role=$TF_VAR_vault_role jwt=$CI_JOB_JWT)"
    - vault token lookup
For our vault_auth job we execute two script level commands:
- The first allows authentication to Vault via the JWT method.
- We specify the role we want to use. Here the role is web-pipeline which we configured earlier.
- We use the CI_JOB_JWT environment variable provided by Gitlab-CI for our job. This variable contains the JWT token to authenticate our CI job to the Vault.
- Finally, we retrieve the Vault token and set it to the VAULT_TOKEN environment variable. This will be used again by Terraform for the rest of its actions.
- The second line vault token lookup allows us to check the duration of our Vault token, the attached policies, etc.
Use of secrets via Terraform
We have two types of secrets that Terraform, at the level of our IC, must interact with:
- AWS: retrieve the credentials of the AWS session via an assume role in order to deploy the IaC. In our case: an EC2 instance and an RDS database.
- Database: storing the database secret at the Vault level. In our case: the administrator user of the database.
For AWS secrets, Terraform is able to retrieve its credentials via the Vault provider:
data "vault_aws_access_credentials" "creds" {
  backend = "aws"
  role    = "web-pipeline"
  type    = "sts"
}

provider "aws" {
  region     = var.region
  access_key = data.vault_aws_access_credentials.creds.access_key
  secret_key = data.vault_aws_access_credentials.creds.secret_key
  token      = data.vault_aws_access_credentials.creds.security_token
}
For database secrets, once the RDS database is created, we establish the connection between Vault and the database, allowing Vault to perform its actions on the database through the database user admin :
resource "vault_database_secret_backend_connection" "mysql" {
  backend       = local.db_backend
  name          = "mysql"
  allowed_roles = [var.project_name]

  mysql {
    connection_url = "${aws_db_instance.web.username}:${random_password.password.result}@tcp(${aws_db_instance.web.endpoint})/"
  }
}
If you want to rotate the administrator’s password to ensure that only Vault knows it, you can do the following command:
# Vault admin privilege (only for test)
$ vault write -force web-db/rotate-root/mysql
And finally, so that the application can use its database secrets, we create a Vault role on which it will create a readonly user on the database with a defined (preferably short) duration:
# Create a role for readonly user in database
resource "vault_database_secret_backend_role" "role" {
  backend             = local.db_backend
  name                = web
  db_name             = vault_database_secret_backend_connection.mysql.name
  creation_statements = ["CREATE USER '{{name}}'@'%' IDENTIFIED BY '{{password}}';GRANT SELECT ON *.* TO '{{name}}'@'%';"]
  default_ttl         = var.db_secret_ttl
}
Once the project is deployed through the CI, we can test our application secrets in this way:
# Vault admin privilege (only for test)
$ vault read web-db/creds/web ttl=1m
At this stage, we have succeeded in addressing our various issues for our IC. This gives the following result:
Expiration and rotation of our CI secrets
So far, we have managed to set up a CI through Gitlab, Terraform and Vault that addresses our various issues.
This results in the following workflow:
If access to our secrets is secure, what about rotation?
- Access to the Vault via the Vault token: the Vault CLI takes care of authenticating itself at each Gitlab-CI job launch. In other words, the Vault token is unique per job (disposable token) and has a time-limited TTL (e.g. 1min).
- AWS secrets: Terraform retrieves AWS secrets (session assumed through a Vault role) at each run. The secrets are unique to each run and limited in time (e.g. 5min).
- The database secrets are at 2 levels:
- The administrator database user is stored in the Vault and its password is changed by Vault. At this point only Vault can know the credentials (excluding Vault administrators)
- The application database user is generated at the request of the application and has a time-limited TTL (e.g. 1 hour). The secret in question is a readonly user and therefore has limited rights.
We have seen how to solve our CI issues, but it doesn’t stop with the deployment of our application infrastructure.
Our application still needs to retrieve its secrets through the Vault. How can we address this issue in the most transparent way possible? This will be discussed in the third and final part of the article.
Commentaires :
A lire également sur le sujet :