Jitsi Meet on ECS Fargate

Hello traveler. Your quest to find a working Terraform stack deploying Jitsi Meet on AWS Fargate is now over. The next article will detail how I have implemented it.
What is Jitsi Meet ?
Jitsi is a collection of Open Source projects. The main projects supported by the Jitsi team are Jitsi Meet, Jitsi Videobridge, Jitsi Conference Focus, Jitsi Gateway to SIP and Jitsi Broadcasting Infrastructure. All these products installed together creates a voice and video conferencing solution, totally free and customisable.
There is no “Enterprise” version of Jitsi Meet, and no predator licensing, you can just get the source code for free and use it as long as you are smart enough to install it, scale it and maintain it.
Jitsi is not alone in the video conferencing marketplace, BigBlueButton is the principal free and Open Source concurrent. However, BigBlueButton is focused on stability and I frequently found a lack of support for BigBlueButton with recent Ubuntu versions.
What is Fargate in Amazon ECS ?
Amazon ECS is one of the container services running in Amazon Web Services. This AWS service has many deployment flavors, you can run your containers into EC2 machines with Amazon EC2, you can just run containers in a serverless way using AWS Fargate, and you can also do complicated things using Kubernetes with Amazon EKS.
Amazon EKS has its own API, consequently you can consider it as an independent service, but AWS Fargate does not. For a long time, we could have considered Fargate as just another Amazon ECS feature, but recently, it appeared that you can also run Amazon EKS containers with AWS Fargate.
You may also have noticed that ECS is called “Amazon ECS” and Fargate is “AWS Fargate”. Fargate does not have a dedicated api and can run containers from Amazon EKS and Amazon ECS; it is one of the AWS-named services, and not one of the Amazon-named. As a consequence, we can consider AWS Fargate not as a service but more as a sort of runtime for containers that can be plugged into Amazon ECS or Amazon EKS as Amazon EC2 does.
If you would like to see an AWS Solution Architect freeze, just ask him why some services are “Amazon *” and other “AWS *”. If he argues that AWS things are utilities and Amazon things are standalone services, ask him why Config is AWS Config while CloudWatch is Amazon CloudWatch.
Run Jitsi Meet With AWS Fargate
First of all, you may have noticed that the creators of Jitsi Meet do not provide ready-to-use samples to run Jitsi in managed container services such as Kubernetes or Amazon ECS. A few community contrib samples are available in the jitsi-contrib GitHub organization with a Kubernetes operators but nothing using Amazon ECS EC2, and consequently nothing using AWS Fargate.
My implementation will not pretend to be a reference, but it is currently the only one available on the Internet, deal with it 😀
Jitsi Meet and Docker
As Jitsi Meet do not provide managed container deployment samples, it does suggests a Docker-base architecture in its documentation, using Docker Compose: https://jitsi.github.io/handbook/docs/devops-guide/devops-guide-docker/#quick-start
The Docker-compose stack is quite clean and almost every configuration parameter is exposed as container variables. It is very likely you will not need to create a custom Docker image to run it. To install Jitsi Meet with Docker-Compose, the documentation states:
- Download and extract the latest release
- Create a .env file by copying and adjusting env.example
- Set strong passwords in the security section options of .env file by running the bash script gen-passwords.sh
- Create required CONFIG directories
- Run docker-compose up -d
- Access the web UI at https://localhost:8443 (or a different port, in case you edited the .env file).
The setup seems to be very straightforward. The docker-compose script is performing all the magic for us, the challenge will essentially consist in converting these scripts into an AWS Fargate syntax. In the next chapter, I will skip the Jigasi and Etherpad installation because I do not require it, but it is as simple as having additional modules.
Jitsi Meet and Fargate
Let’s be clear, AWS Fargate configuration files have basically the same logic than Docker-Compose files. You may have noticed that there is an ECS integration of Compose files, but I will not use it in my implementation because this feature will be retired in future Docker versions.
Converting a Docker-compose file into AWS Fargate file is actually very straightforward, even without the ECS Integration of Compose files: Docker-compose services will be converted to Amazon ECS services and task definitions, deployments will become scaling policies, ports definitions are task definition configuration and security group rules and secrets will be mapped to parameters. All this logic is detailed in the architecture “ECS Integration of Compose files”: https://docs.docker.com/cloud/ecs-architecture/
Let’s convert the Docker-compose file into ECS services and tasks. There is 4 services in the Docker-compose YAML file to migrate:
- web (Frontend)
- prosody (XMPP server)
- jicofo (Focus component)
- jvb (Jitsi Video Bridge)
Some services expose ports to the Internet, others require to be able to communicate with each other privately. The architecture synthesis is available in the Jitsi documentation.

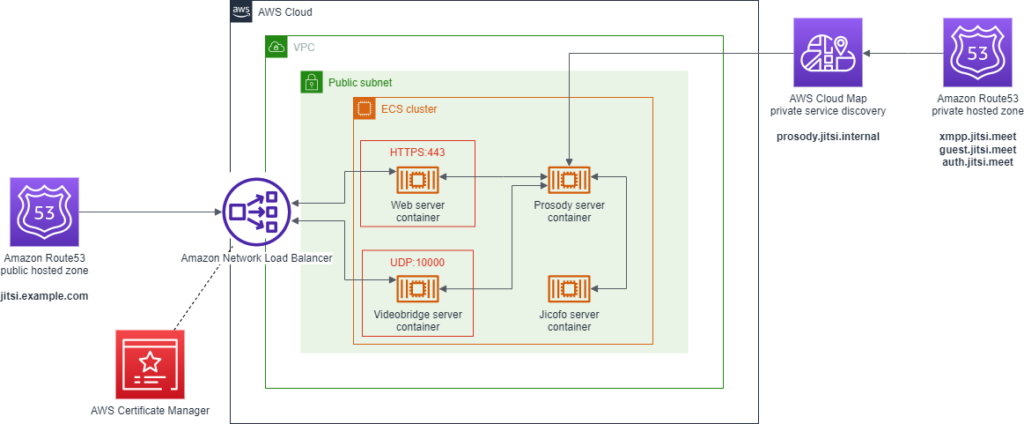
We will not deploy a Jigasi server because it is not useful for the demo, consequently the only ports opened to the Internet will be the Jitsi videobridge and Jitsi web server ports, respectively 1000 (UDP) and 443 (HTTPS). The HTTP certificate is claimed using LetsEncrypt, consequently we will require to own a public domain.
The target AWS architecture is below.

Prosody ECS service
The prosody service is one of the main core components of Jitsi Meet. It is by default not exposed to the Internet. One very important point on this component is that it is responsible for signaling, in other words, this component will collect and announce the other component’s IPs. Consequently, we will require a private DNS for it. For scaling and pricing optimization reasons this private DNS definition will be mapped using aliases to service discovery endpoints (powered by AWS CloudMap service).
Prosody server also requires many password definitions to communicate with other services and to configure its own authentication. For ease, these passwords will be generated by Terraform and pushed into Amazon Systems Manager Parameter Store parameters. The creation of these passwords is below, with some Terraform syntax tricks to keep the code compact.
locals {
  jitsi_passwords = toset([
    "JICOFO_AUTH_PASSWORD",
    "JVB_AUTH_PASSWORD",
    "JIGASI_XMPP_PASSWORD",
    "JIBRI_RECORDER_PASSWORD",
    "JIBRI_XMPP_PASSWORD",
  ])
}

resource "random_password" "jitsi_passwords" {
  for_each = local.jitsi_passwords
  length   = 32
}

resource "aws_ssm_parameter" "jitsi_passwords" {
  for_each = local.jitsi_passwords
  name     = "/${local.resources_prefix}/${each.key}"
  type     = "SecureString"
  value    = random_password.jitsi_passwords[each.key].result
}
The task definition of the Prosody server is below. You can see other Terraform syntax magic blocks to inject all generated secrets directly as external parameters. Details about this AWS feature are available in Amazon ECS documentation.
resource "aws_ecs_task_definition" "jitsi_prosody" {
  family                   = "${local.resources_prefix}-jitsi-prosody"
  network_mode             = "awsvpc"
  requires_compatibilities = ["FARGATE"]
  cpu                      = 256
  memory                   = 1024

  container_definitions = jsonencode(
    [
      {
        essential = true,
        image     = "jitsi/prosody:stable-8615",
        name      = "prosody",
        secrets = [
          for secret_key in toset([
            "JIBRI_RECORDER_PASSWORD",
            "JIBRI_XMPP_PASSWORD",
            "JICOFO_AUTH_PASSWORD",
            "JIGASI_XMPP_PASSWORD",
            "JVB_AUTH_PASSWORD",
          ]) :
          {
            name      = secret_key
            valueFrom = aws_ssm_parameter.jitsi_passwords[secret_key].arn
          }
        ]
        environment = [],
        portMappings = [
          {
            containerPort = 5222,
            hostPort      = 5222,
            protocol      = "tcp"
          },
          {
            containerPort = 5347,
            hostPort      = 5347,
            protocol      = "tcp"
          },
          {
            containerPort = 5280,
            hostPort      = 5280,
            protocol      = "tcp"
          }
        ],
      },
  ])
  task_role_arn      = aws_iam_role.jitsi_prosody.arn
  execution_role_arn = aws_iam_role.task_exe.arn
}
The Service Discovery and private DNS setup is below. As you can see, we register several aliases to the same service definition endpoint to have the Prosody server available for both authenticated and unauthenticated components.
resource "aws_service_discovery_private_dns_namespace" "jitsi" {
  name        = "jitsi.internal"
  description = "Jitsi internal"
  vpc         = module.vpc.vpc_id
}

resource "aws_service_discovery_service" "jitsi_prosody" {
  name = "prosody"

  dns_config {
    namespace_id = aws_service_discovery_private_dns_namespace.jitsi.id

    dns_records {
      ttl  = 10
      type = "A"
    }

    routing_policy = "MULTIVALUE"
  }

  health_check_custom_config {
    failure_threshold = 1
  }
}

resource "aws_route53_zone" "jitsi" {
  name = "meet.jitsi"

  vpc {
    vpc_id = module.vpc.vpc_id
  }
}

# Base XMPP service
resource "aws_route53_record" "jitsi" {
  zone_id = aws_route53_zone.jitsi.zone_id
  name    = "meet.jitsi"
  type    = "A"

  alias {
    name                   = "prosody.jitsi.internal"
    zone_id                = aws_service_discovery_private_dns_namespace.jitsi.hosted_zone
    evaluate_target_health = false
  }
}

# Prosody service discovery on xmpp.meet.jitsi (required for signaling)
resource "aws_route53_record" "jitsi_xmpp" {
  zone_id = aws_route53_zone.jitsi.zone_id
  name    = "xmpp.meet.jitsi"
  type    = "A"

  alias {
    name                   = "prosody.jitsi.internal"
    zone_id                = aws_service_discovery_private_dns_namespace.jitsi.hosted_zone
    evaluate_target_health = false
  }
}

# Authenticated XMPP service discovery on auth.meet.jitsi
resource "aws_route53_record" "jitsi_auth" {
  zone_id = aws_route53_zone.jitsi.zone_id
  name    = "auth.meet.jitsi"
  type    = "A"

  alias {
    name                   = "prosody.jitsi.internal"
    zone_id                = aws_service_discovery_private_dns_namespace.jitsi.hosted_zone
    evaluate_target_health = false
  }
}

# XMPP domain for unauthenticated users
resource "aws_route53_record" "jitsi_guest" {
  zone_id = aws_route53_zone.jitsi.zone_id
  name    = "guest.meet.jitsi"
  type    = "A"

  alias {
    name                   = "prosody.jitsi.internal"
    zone_id                = aws_service_discovery_private_dns_namespace.jitsi.hosted_zone
    evaluate_target_health = false
  }
}
Jicofo ECS service
Jicofo is the most basic component of all the Jitsi stack. It only requires to have the port 8888 opened to other components, and its password configured as an environment variable. Jicofo will announce himself to the signaling server (aka the Prosody component) with the default domain xmpp.jitsi.meet, consequently we do not require to set the signaling server reference. The task definition is below.
resource "aws_ecs_task_definition" "jitsi_jicofo" {
  family                   = "${local.resources_prefix}-jitsi-jicofo"
  network_mode             = "awsvpc"
  requires_compatibilities = ["FARGATE"]
  cpu                      = 256
  memory                   = 1024

  container_definitions = jsonencode(
    [
      {
        essential = true,
        image     = "jitsi/jicofo:stable-8615",
        name      = "jicofo",
        secrets = [
          {
            name      = "JICOFO_AUTH_PASSWORD"
            valueFrom = aws_ssm_parameter.jitsi_passwords["JICOFO_AUTH_PASSWORD"].arn
          }
        ]
        environment = [],
        portMappings = [
          {
            containerPort = 8888,
            hostPort      = 8888,
            protocol      = "tcp"
          }
        ],
      },
  ])
  task_role_arn      = aws_iam_role.jitsi_jicofo.arn
  execution_role_arn = aws_iam_role.task_exe.arn
}
Web ECS service
The Jitsi web service is the visible part of the iceberg. It exposes the Jisti website and Jitsi API with an HTTPS certificate requested from LetsEncrypt. Because we would not want to pay for an expensive NAT Gateway to query LetsEncrypt over the Internet, a public IP will be assigned to this container and it will be deployed in a public subnet. It is not ideal, but we will improve that later.
resource "aws_ecs_task_definition" "jitsi_web" {
  family                   = "${local.resources_prefix}-jitsi-web"
  network_mode             = "awsvpc"
  requires_compatibilities = ["FARGATE"]
  cpu                      = 256
  memory                   = 512

  container_definitions = jsonencode(
    [
      {
        essential = true,
        image     = "jitsi/web:stable-8615",
        name      = "web",
        secrets = []
        environment = [
          {
            name  = "ENABLE_LETSENCRYPT",
            value = "1",
          },
          {
            name  = "LETSENCRYPT_DOMAIN",
            value = var.domain_name,
          },
          {
            name  = "LETSENCRYPT_EMAIL",
            value = "root@${var.domain_name}",
          },
          {
            name  = "PUBLIC_URL",
            value = "https://${var.domain_name}",
          },
        ],
        portMappings = [
          {
            containerPort = 443,
            hostPort      = 443,
            protocol      = "tcp"
          }
        ],
      },
  ])
  task_role_arn      = aws_iam_role.jitsi_web.arn
  execution_role_arn = aws_iam_role.task_exe.arn
}
Jitsi Video Bridge ECS service
The Jitsi Video Bridge component (aka “jvb”) is the most technically advanced component. It is responsible for serving the media over UDP. It will also act as a TURN relay (if configured) and can call STUN servers for it.
Consequently, when configured to be a TURN relay (which is absolutely required when peer-to-peer media exchange is not possible) the JVB component will require Internet access to call STUN servers (by default, Google ones). For simplicity and to avoid spending dollars in a NAT Gateway, this component will also have a public IP address configured and be deployed in a public subnet, similarly to the web component.
The task definition is below. You can notice that an additional 8080 TCP port is exposed by the container along the 10000 UDP port. This port will be the health check target. See the next chapter for details on it.
resource "aws_ecs_task_definition" "jitsi_jvb" {
  family                   = "${local.resources_prefix}-jitsi-jvb"
  network_mode             = "awsvpc"
  requires_compatibilities = ["FARGATE"]
  cpu                      = 1024
  memory                   = 4096

  container_definitions = jsonencode(
    [
      {
        essential = true,
        image     = "jitsi/jvb:stable-8615",
        name      = "jvb",
        secrets = [
          {
            name      = "JVB_AUTH_PASSWORD"
            valueFrom = aws_ssm_parameter.jitsi_passwords["JVB_AUTH_PASSWORD"].arn
          }
        ]
        environment = [],
        portMappings = [
          {
            containerPort = 10000,
            hostPort      = 10000,
            protocol      = "udp"
          },
          {
            containerPort = 8080,
            hostPort      = 8080,
            protocol      = "tcp"
          }
        ],
      },
  ])
  task_role_arn      = aws_iam_role.jitsi_jvb.arn
  execution_role_arn = aws_iam_role.task_exe.arn
}
Exposing services to the Internet
To expose all these AWS Fargate services to the Internet, as the Jitsi web component and the Jitsi jvb component currently have a public IP, I could have routed the traffic on it using a Service Discovery public domain. Doing that, the Fargate containers would directly be accessible over the Internet at startup. It is the cheapest and simplest way to do it. However, I plan to add a web application firewall using AWS WAF in the future, consequently, I preferred to connect an Amazon Network Load Balancer, and I registered the AWS Fargate containers into target groups. With this preferred setup, I can have a fine-grained control on container startup timeouts and health checks. Moreover, I can now think about improvements allowing me to remove the public IPs on these containers, reducing the exposed surface.
The web and jvb target group configuration is below.
resource "aws_lb_target_group" "jitsi_web" {
  name                 = "${local.resources_prefix}-jitsi-web"
  port                 = "443"
  protocol             = "TCP"
  vpc_id               = module.vpc.vpc_id
  target_type          = "ip"
  deregistration_delay = "60"
  slow_start           = "0"

  health_check {
    port     = "traffic-port"
    protocol = "HTTPS"
    path     = "/"
    matcher = "200-399"
  }
}

resource "aws_lb_target_group" "jitsi_jvb" {
  name                 = "${local.resources_prefix}-jitsi-jvb"
  port                 = "10000"
  protocol             = "UDP"
  vpc_id               = module.vpc.vpc_id
  target_type          = "ip"
  deregistration_delay = "60"
  slow_start           = "0"

  health_check {
    port     = "8080"
    protocol = "HTTP"
    path = "/about/health"
    matcher = "200"
  }
}
The network load balancer configuration is below.
resource "aws_lb" "jitsi_public" {
  name                       = "${local.resources_prefix}-jitsi-public"
  internal                   = false
  load_balancer_type         = "network"
  subnets                    = module.vpc.public_subnets
  enable_deletion_protection = true
}
resource "aws_lb_listener" "jitsi_web" {
  load_balancer_arn = aws_lb.jitsi_public.arn
  port              = "443"
  protocol          = "TCP"

  default_action {
    type             = "forward"
    target_group_arn = aws_lb_target_group.jitsi_web.arn
  }
}
resource "aws_lb_listener" "jitsi_jvb" {
  load_balancer_arn = aws_lb.jitsi_public.arn
  port              = "10000"
  protocol          = "UDP"

  default_action {
    type             = "forward"
    target_group_arn = aws_lb_target_group.jitsi_jvb.arn
  }
}
Improvements
Certificate
You may have noticed that I copied the Jitsi Docker stack “as-is”, and in particular the HTTPS certificate management using LetsEncrypt. This setup forces the web component to have a direct Internet access from a public subnet or to run a NAT Gateway / NAT Instance to query LetsEncrypt with the CSR. Moreover, during the deployment, the HTTP:80 port will serve well-known challenges to allow Letsencrypt checking for domain property and when the web container will scale up and pop a new container along another running one, we cannot be sure to expose the correct challenges to Letsencrypt. Finally, LetsEncrypt has rate limits and even if it is comfortable limits each time the web server container scales up or restart we will ask for a certificate, and we may have race conditions with that in case of an incident requiring to restart many times the web container.
Fortunately, AWS Network Load Balancers now have TLS listeners ! I can remember myself questioning the utility of this feature when it was launched a few years ago, because AWS Application Load Balancers already performed it. This setup with a Network Load Balancer serving UDP and also a TLS certificate is totally what I need currently because Application Load Balancers cannot serve UDP.
The setup now changed with a certificate requested in Amazon Certficate Manager as below, with service discovery and Hosted Zones.

The Terraform files are also changed to reflect the architecture change:
resource "aws_lb" "jitsi_public" {
  name                       = "${local.resources_prefix}-jitsi-public"
  internal                   = false
  load_balancer_type         = "network"
  subnets                    = module.vpc.public_subnets
  enable_deletion_protection = true
}

# HTTPS output to Internet (Jisti Web server)
resource "aws_lb_listener" "jitsi_web" {
  load_balancer_arn = aws_lb.jitsi_public.arn
  port              = "443"
  protocol          = "TLS"
  certificate_arn   = aws_acm_certificate.jitsi_public.arn
  alpn_policy       = "HTTP2Preferred"

  default_action {
    type             = "forward"
    target_group_arn = aws_lb_target_group.jitsi_web.arn
  }
}

# UDP output to Internet (Jitsi Video Bridge)
resource "aws_lb_listener" "jitsi_jvb" {
  load_balancer_arn = aws_lb.jitsi_public.arn
  port              = "10000"
  protocol          = "UDP"

  default_action {
    type             = "forward"
    target_group_arn = aws_lb_target_group.jitsi_jvb.arn
  }
}

# AWS ACM certificate
resource "aws_acm_certificate" "jitsi_public" {
  domain_name       = var.domain_name
  validation_method = "DNS"

  lifecycle {
    create_before_destroy = true
  }
}

# Certificate validation
resource "aws_acm_certificate_validation" "jitsi_public" {
  certificate_arn         = aws_acm_certificate.jitsi_public.arn
  validation_record_fqdns = [for record in aws_route53_record.jitsi_public_certificate_validation : record.fqdn]
}

# Route53 record for certificate validation
resource "aws_route53_record" "jitsi_public_certificate_validation" {
  for_each = {
    for dvo in aws_acm_certificate.jitsi_public.domain_validation_options : dvo.domain_name => {
      name   = dvo.resource_record_name
      record = dvo.resource_record_value
      type   = dvo.resource_record_type
    }
  }
  allow_overwrite = true
  name            = each.value.name
  records         = [each.value.record]
  ttl             = 60
  type            = each.value.type
  zone_id         = var.hosted_zone_id
}
Because Jitsi will still deploy a self-signed certificate when LetsEncrypt is disabled, the target group of the Jitsi web service must also be changed to TLS, indicating the Network Load Balancer to decrypt the container’s traffic before encrypting and serving it over the Internet. Keeping a TCP target group while the container is serving encrypted traffic will absolutely fail.
resource "aws_lb_target_group" "jitsi_web" {
  name                 = "${local.resources_prefix}-jitsi-web"
  port                 = "443"
  protocol             = "TLS"
  vpc_id               = module.vpc.vpc_id
  target_type          = "ip"
  deregistration_delay = "60"
  slow_start           = "0"

  health_check {
    port     = "traffic-port"
    protocol = "HTTPS"
    path     = "/"
    matcher = "200-399"
  }
}
Autoscaling
I have Jitsi components with comfortable memory and CPU limits, however we may face traffic surge and the infrastructure must respond automatically to it. Configuring scaling response to a CPU or memory metric is detailed in this documentation: https://repost.aws/knowledge-center/ecs-fargate-service-auto-scaling
As (almost) every AWS blog post, it is a great documentation for people clicking in the AWS console or using awscli in bash scripts, but it is pretty insufficient not for us using CloudFormation or Terraform.
After a little research, I finally found a sample using Terraform. To scale up my AWS Fargate service I will require to associate it with a scaling configuration and then configure scaling policies. The resulting Terraform code is below.
resource "aws_appautoscaling_target" "jitsi_prosody" {
  max_capacity       = 4
  min_capacity       = 1
  resource_id        = "service/${aws_cluster.jitsi.name}/${aws_service.jitsi_prosody.name}"
  scalable_dimension = "ecs:service:DesiredCount"
  service_namespace  = "ecs"
}

resource "aws_appautoscaling_policy" "ecs_policy" {
  name               = "scale-down"
  policy_type        = "StepScaling"
  resource_id        = aws_appautoscaling_target.jitsi_prosody.resource_id
  scalable_dimension = aws_appautoscaling_target.jitsi_prosody.scalable_dimension
  service_namespace  = aws_appautoscaling_target.jitsi_prosody.service_namespace

  step_scaling_policy_configuration {
    adjustment_type         = "ChangeInCapacity"
    cooldown                = 60
    metric_aggregation_type = "Maximum"

    step_adjustment {
      metric_interval_upper_bound = 0
      scaling_adjustment          = -1
    }
  }
}
Because this configuration will dynamically change the desired_count value of the ECS service, I advise you to add a lifecycle policy ignoring changes on this attribute on the ECS service configuration as below.
resource "aws_ecs_service" "ecs_service" {
  name            = "${local.resources_prefix}-jitsi-prosody"
  cluster         = aws_cluster.jitsi.name
  task_definition = aws_task_definition.jitsi_prosody.arn
  desired_count   = 1

  lifecycle {
    ignore_changes = [desired_count]
  }
}
Conclusion
This article explaining how I have deployed Jitsi Meet in AWS ECS with a Fargate runtime has now reached its end ! The source code presented in this document covers about 80% of the source code, feel free to ask for the full Terraform stack if required. Me and my friends at Revolve can also help you installing it in your AWS account. 🙂


